


From qgis basics for journalists by Len De Groot of KDMC @ UC Berkeley School of Journalism
Updated for QGIS Version 1.9
Edit vector maps
It's fairly easy to edit individual boundaries in QGIS, but I recommend journalists avoid it until they are more advanced. But there are some cases where you will need to bulk edit to your polygons. QGIS includes several tools that make that simple. We're going to explore the Difference command.
Consider our Alameda map. You may have noticed that the western edge doesn't conform to the shape of the San Francisco Bay. That's because political boundaries extend offshore and Census maps reflect political boundaries. If you were to superimpose this on a Google or GeoCommons map, it would look very odd.
In QGIS, we use a water SHP file to "clip" the boundaries to the shoreline.
Add a water layer
Go to the Layer menu and select Add vector layer (Command-shift-V). Navigate to the project files and open SHP files - source folder, then the alameda-2010-water folder and then click on the file that ends in .shp. Click Open.
A map of ocean, lakes and rivers will appear in the layout area and is added to the layer panel. While this is a perfectly fine way to render a map, we will use the water boundaries to edit the tract map.
Select the SF Bay shapes
We need to figure out how to quickly select just the SF Bay water boundaries because we don't want to cut the lakes out of the land layer. To do this, go to the View menu and select IdentifyFeatures. Click on one of the SF Bay boundaries and a window ill appear with its attributes:

The FULLNAME field identifies the boundary as part of the San Francisco Bay.
The MTFCC field identifies the boundary as H2051.
You might be tempted to use the FULLNAME field but don't. It may not include important estuaries that define the coastline. Best practice is to use MTFCC which is short for MAF/TIGER Feature Class Code (Yes, it's an acronym of an acronym — get used to it). MTFCCs group similar features. H2051 identifies Bays, Estuaries, Gulfs and Sounds.
NOTE: Lists of MTFCC codes have been included in the Resources folder in the tutorial files.
Go to the Layer menu and select Open Attributes Table.
Click the Advance Search button. In the Fields area, click on MTFCC. Look in the Values area and click the All button.
Double-click MTCFF to add it to the text field. Click the Equals button, then double-click H2051 in the Values box.
Or you can simply type MTFCC = 'H2051' in the text field. Click OK and close the Attributes Table window. All the boundaries that affect the coastline should now be selected.
Clip the tract layer
Go to the Vector menu and select Geoprocessing Tools and select Difference. Make sure the window is set up like the example below.
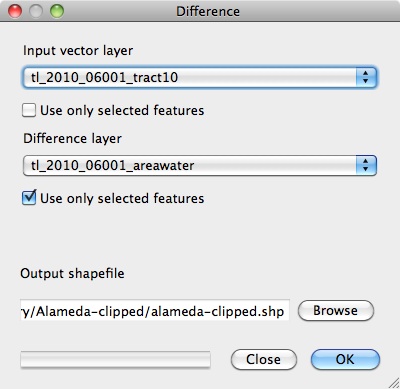
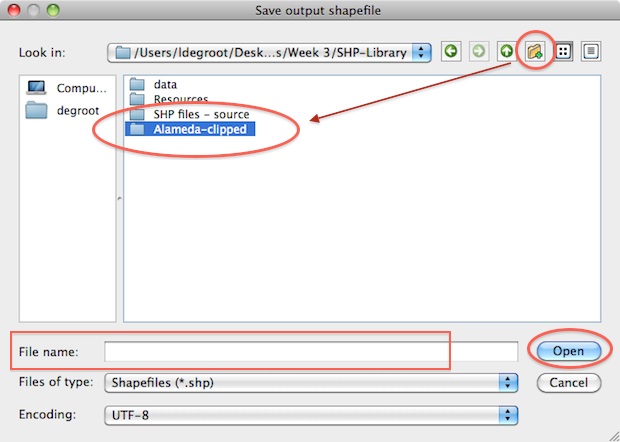
To get an Output shapefile, click the Browse button and navigate to the tutorial files. Create a new folder (button is on the top right), open it and give the file a name. When you're done, click Save to return to the Difference window.
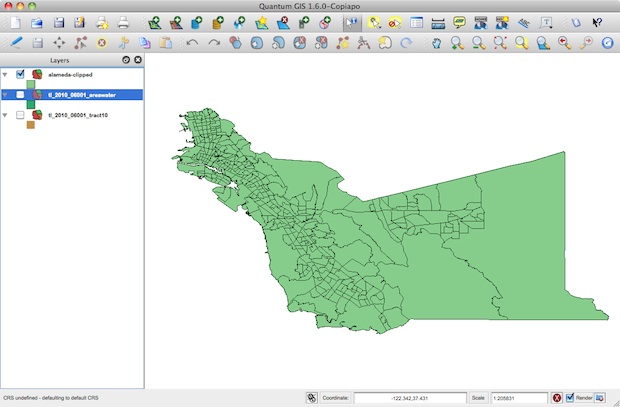
Click OK and the operation will process. QGIS will ask if you want to add the new file to your project. Click Yes then click the Close button on the Difference window. You should end up with something that looks like this:
This one of the many powerful tools available in QGIS and they are explained in the manual (included in the resources folder). Take some time and experiment.
Save your work.